Tuesday, September 25, 2007

Mega Optimus Prime Costume Update (Yes, I resisted saying Megatron. (Does that still count?))

Last night I got 2 more sheets of styrofoam and between then and now made a lot of progress. I began by cutting arm holes in the torso. Measurements were kind of rough as I just tried the torso on and made utility knife cuts roughly where the front and back of my arm would go. A quick test proved everything worked just fine.

Next I decided to do the top of the chest. For this I put the torso upside down onto a piece of foam and traced it. Any of the detailing Optimus Prime has can be added later, so I didn't need to worry about doing any bizarre cuts... at this point anyway. I designed the top so that it'll slide back toward my neck and then the small rectangular piece will be inserted at the back to lock everything in place.

Here's a dry run. Unfortunately, the styrofoam I got from Home Depot this time went through hell. It was warped pretty bad (as you can see by the left side curling up) and had divots knocked out of it everywhere.


I decided to get around this problem by using wooden dowels that, once glued in place, would hopefully hold everything down. Didn't work. At all.


The following picture is the top now being glued down.


... and a view from inside of the now larger head hole. (It's still not too bad. I plan on wearing a red turtleneck under this anyway so it'll all work out.)


I screwed up earlier when tracing the torso for sizing how big the top should be. I forgot about the extra overhang where Optimus Prime's windows will be. I traced where the top left off and mirrored the line the distance of the windows' thickness away from the original.

Next (you guessed it), I glued
the new extended overhang on.


Here's the new overhang after being carved and rounded. In retrospect, maybe the Transformer I picked should've been Shockwave, he's much more boxy.


I also began working on the second forearm. Since this has already been flogged to death earlier, I'll just show the pics:


Saturday, September 22, 2007

I'll Take What's In The Box, Monty

Gluing the back of the chest was an exercise in playing Jenga(tm). While the glued joints seem sturdy enough, that thing was sagging like mad once I put the books on it. Not wanting to risk my Transformer turning into a home improvement project gone wrong, I stacked a bunch of cans of spray paint et cetera to support the middle.


When all was said and done, I ended up with a box that tapered off at the bottom. The fit isn't bad, it leaves about an inch of space on both the front and back. Arm holes still need to be cut out but I can do that in a little bit. (In other words, when I'm feeling more patient.) I don't want an Optimus Prime costume with arms sticking out of his hips. Or do I... (No.)


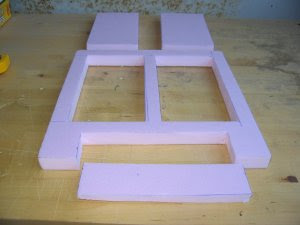
Given the amazing (read: craptastic) job I did of aligning and cutting the layers for Optimus Prime's windows, I needed to add a few spacers and do some trimming here and there. You can see the vertical wedges to even things out in between the window frame halves. I'm not incredibly concerned about how things will look inside as most of the time the windows will be closed.


In gluing the windows, I had to invoke all the skill I got from playing Jenga again. (Seriously, it's on my resume right under my ability to set up that damned thing from Mouse Trap in under 18 hours.) You can see how much the front is sagging, and that's 1 inch thick styrofoam. It looks like a geriatric transformer.


Here is the chest, now dry. As with everything on this costume, I'll have to trim the pieces here and there to ensure they line up well.


With that done, I painted the windows. Why not. I'm going to hold off on painting the torso until I can get the 'box' on the back. Yeah. Optimus Prime has a little box on his back. I also think I'm going to get the top of the torso done too and maybe the hip-piece. I don't know if I need to make it shorter yet. We'll see.

Thursday, September 20, 2007

Surely You Chest

Status: Running low on styrofoam. Girlfriend hasn't left me yet because of this.
Overall: Not too shabby!

With my decision to continue forward with the torso solidified, I cut and glue the remaining side panels in place. There are gaps. There are probably gaps you can see through. There are gaps you could shove 5 dollar bills through... but this isn't that kind of costume. I figure I'll fill them with gap filler which I'll buy on my next materials run (which should happen soon).


With the first 'large' '3D' piece done, I finally feel like I'm accomplishing something. The back, while cut out, still needs to be glued in place. Before that can happen, I need to cut a few inches off the depth of the torso 'box'. (I'm glad I don't fit into a square box, that'd be depressing). The arm holes still need to be measured and cut out. Overall, I really need to hit Home Depot and get some more styrofoam.

Using what little materials I had left, I finished the foot shroud. This basically consisted of carving off the excess styrofoam and glue.


That's it for now. Before the materials run I'm going to do some detail work. This started off as a venture in being obsessive compulsive with styrofoam, I'd be really curious to see if anybody's actually reading this, and moreso if they're making an Optimus Prime costume themselves.

Tuesday, September 18, 2007

Miscellaneous Body Parts

I'm beginning to run low on styrofoam which means I'm beginning to pick and choose what I want to complete. For now I've decided on the body as I can use the odd shaped leftovers for trim, detailing, etc. I painted one of the shoulders and did some detailing on the forearm:


While this was drying I decided to work a little more on the front of the leg. I cut two rectangular pieces of styrofoam for the foot shroud, cut off the edge where necessary, and glued the pieces in place. This will be trimmed later to make everything flush.


With this little bit of housekeeping out of the way, I got to work on the torso. As the torso bevels towards the waistline starting at about 11 inches down, I've only cut two panels out for the areas that will rest under my biceps.


Using a cooler and some books, I managed to rig things up so I could apply weight to the whole thing.

Monday, September 17, 2007

Painting The Town - - Err Arm Red

On Saturday I went down to the local Canadian Tire (hardware store) since they've actually got a decent selection of spray paint. As recommended on numerous sites, I found the styrofoam friendly Krylon H2O Latex paint. I quickly snatched up cans of red and blue, but hit a snag when they didn't have silver. They did have grey, and after some though I figured that in the Transformers cartoon, Optimus Prime had a grey grill. Sure silver would look better, but it'd also eat up styrofoam unless I could find some sort of styrofoam safe kind. Besides. I can always paint over it later should I find some decent silver.

With the three cans of paint ready to go (and surprisingly no sales people thinking I was a conscientious vandal who uses water based paint so his work can be cleaned up easily), I sacrificed my Roomba's box to make a spray booth. Come on. You think a guy doing all this work for an Optimus Prime costume would have any other vacuum cleaner besides a Roomba? Pft! (Seriously, I highly recommend them.)


With even sprays, I covered the forearm. The pen marks still showed through but I think a second coat will take care of that. After it dried, I was pretty happy with the colour. Not too dark at all. I have to admit, up until this point, it was looking like a bunch of pink styrofoam. Adding colour really seems to give it new life.

Saturday, September 15, 2007

Break A Leg. On Second Thought, Don't.

The foot piece was looking rather lonely so I decided to start on the lower leg. There's not much to it, just a rectangular piece of styrofoam with a foot hole cut out. Around where the foot will go is a bit of a shroud. I start by cutting out the rectangular piece.


Satisfied I might be able to walk with two of those strapped to my legs (walk = shuffle like a severe case of diarrhea struck me), I cut out two more rectangles, each with a corner taken off. Below are what they look like as they're being glued to the front of the lower leg.


... and here's how the legs are shaping up. I still need to put the front of the shroud on it, but I've no doubt it'll eventually look like a Transformer. Hopefully the one I'm going for. ;)


Friday, September 14, 2007

The Foot Is Afoo - - -.... Oh To Hell With It

With the costume overall looking alright, I decided to switch gears and start tinkering with the feet. As always, I don't really have much of a plan. I took an old pair of Chuck Taylors from the closet (my girlfriend's glee to get rid of them is gonna turn to angst when she finds out I'm not throwing them away but rather gluing them to 20 lbs of styrofoam) and figure the foot will fit over top of the shoe. Simple enough, just a shoe cap.

I started by cuting out the sides and front.

Then I set up a little mini stonehenge (in sheer homage to Spinal Tap) to let the glue dry...

... which resulted in this. All it needs now is a top...

... which you can see drying here.

I cut a slot out for my ankle, I think that might make it more mobile.

'Cause. Y'know. Strapping a hundred square feet of styrofoam to yourself and 'mobility' go hand in hand.

Thursday, September 13, 2007

How Are Things Shaping Up?

Glad I asked! Here's everything to date (except for the gun).


Wednesday, September 12, 2007

Hot Off The Grill!

These pun-laden titles have got to stop.


To start the grill, I cut out a simple rectangle. Optimus Prime has a rectangular notch at the bottom of his grill and grill lines above it which are divided into two sections. As you can see on the right, I cut out these two sections as well as the large section at the bottom. Since the bottom section is inset a little, I shaved the piece of styrofoam down with the utility knife.


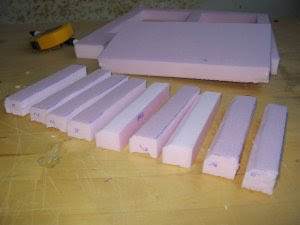
Next, I sliced the rectangular sections that will make the grill lines into neat 1 inch by 1/2 inch pieces. I then bevelled what would be the top edge of each to make the grill look more three dimensional.


Here's a final image of the grill with all of the pieces inserted.

Tuesday, September 11, 2007

The Windows

As much fun as it would be to move on to the other arms and do something I've just finished doing, I decided to work on the front of Optimus Prime's torso. I began by roughly measuring myself (yes, I'm holding back exactly how many inches, get back to your reality TV knaves) and cut a rectangle out of styrofoam. (If it ended up being a square I think I would have cried.) I tapered it off one inch starting close to the mid point. I think that was the easiest piece to do.

After that I cut out two rectangles for the windows. I then drew two smaller rectangles which would be the cut out part, while leaving enough of a frame around the holes to be strong enough.


With the windows cut out, I bevelled the outer edges using my utility knife (which, of course, you can't really see at all here).


I then put the windows on the torso front. They didn't look like they stuck out nearly enough and besides - - I'm supposed to be able to store some beverages in there, right?


I cut out some spacers that would make the windows 3x as thick. I wasn't satisfied with having them appear flat on the body so I made 4 wedge shaped pieces of foam and mounted them on top. Now the windows would look like the roof of a house so to speak.


Below are two more pictures showing the spacers, wedges, and windows.


Here's a dry run of how they'll look. (Nothing has been glued to the torso front yet. Can we say I'm gonna need crack filler? I know I can!)


Tomorrow? The grill!